This post will explain how to modify the hosts file on a Windows machine (this post will work for Windows Vista and newer). There are a few different reasons you may need to modify the hosts file, and the most common reason I have seen so far is working with development sites on your local machine (and also blocking access to a website as a joke, or redirecting to a different website altogether).
Anyways.
To modify the hosts file on a modern Windows machine, you will need to open a plain text editor in Administrator mode. I strongly suggest Notepad for this task.
From the Start menu, find Notepad and right-click on it. You will see an option that says something similar to 'Run as Administrator'. Select this option, and depending on your UAC settings, you may get a confirmation box asking if you want to let Notepad make changes to your computer. Select 'Yes'.
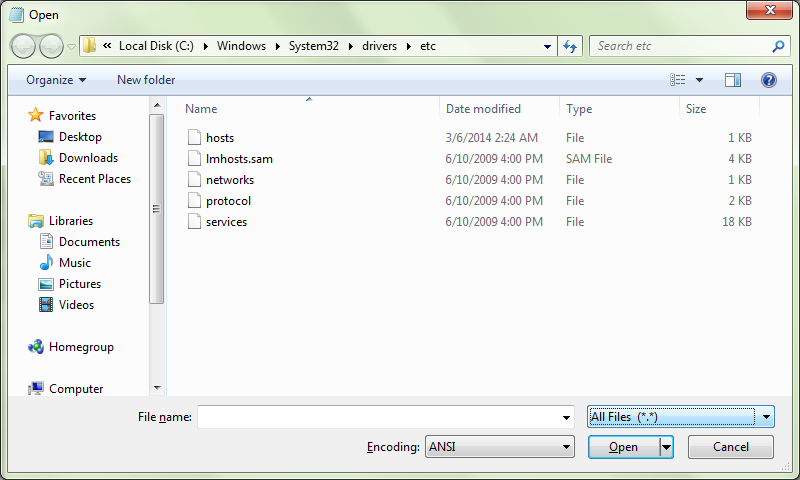
After you have Notepad opened, you need to navigate to the hosts file itself. Do this by going to File > Open. You will need to find your Windows folder, which is usually located on a C directory (so it would normally be C:Windows). Inside the Windows folder, navigate to the System32 folder, then the drivers folder and then the etc folder. The full folder path should be something similar to C:WindowsSystem32driversetc.
By default, Notepad only displays text files with the extension .txt. So you will need to change the filter by selecting the drop down box right above the 'Open' and 'Close' buttons. Change it from 'Text Documents (.txt)' to 'All Files(.*)'. You should now see the hosts file appear in the list. You can now open the hosts file and make changes to it.
The default hosts file looks like this:
 1# Copyright (c) 1993-2009 Microsoft Corp.
 2#
 3# This is a sample HOSTS file used by Microsoft TCP/IP for Windows.
 4#
 5# This file contains the mappings of IP addresses to host names. Each
 6# entry should be kept on an individual line. The IP address should
 7# be placed in the first column followed by the corresponding host name.
 8# The IP address and the host name should be separated by at least one
 9# space.
10#
11# Additionally, comments (such as these) may be inserted on individual
12# lines or following the machine name denoted by a '#' symbol.
13#
14# For example:
15#
16#      102.54.94.97     rhino.acme.com          # source server
17#       38.25.63.10     x.acme.com              # x client host
18
19# localhost name resolution is handled within DNS itself.
20#   127.0.0.1       localhost
21#   ::1             localhost
In a nutshell, it says that the localhost name and the 127.0.0.1 address are handled by Windows internally, so you can not make the localhost name point somewhere else. However, we can add our own new definitions to the list. For example, let's say we already have a server set up and want to access it on our local machine with the domain name www.myserver.test. You can do this by adding these lines to your hosts file:
1127.0.0.1 www.myserver.test
2127.0.0.1 myserver.test
I usually always add the www.* alias to my custom domains in the hosts file, as it clears up some issues when I am working with the Apache web server on a local Windows machine.
This is not as elegant as setting up your own DNS server, but it can help out in those situations where you just need to get something up and running quickly for testing or development.
∎